Using SoapUI to test SharePoint web services
May 12, 2011 8 Comments
SoapUI is a great open-source tool that allows you to run your own SOAP XML against a web service and see the results come back from the SoapUI interface. I’ve played around with SoapUI in the past for some projects that involved external systems using SharePoint web services to send data to a sharepoint list. I am by no means an expert at SoapUI but thought I’d share my learnings. In this walkthrough, I’ll be going over how to use the lists.asmx to add a list item to a list.
Getting Started
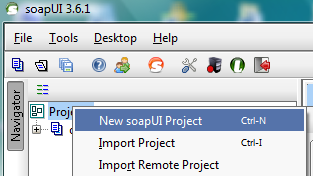
You first need to download SoapUI. Once you’ve downloaded it, open it and create a new project by right-clicking on “Projects” > New soapUI Project:
Add a Project Name and then click OK
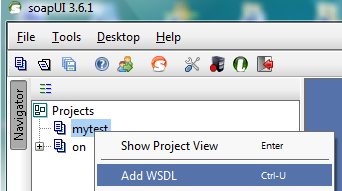
Right-click on the project and then click “Add WSDL”:
Add the WSDL Location. You can access a SharePoint web service via: <site>/_vti_bin/<web service>. In my example we will be using the lists.asmx: <site>/_vti_bin/lists.asmx. To access the WSDL, you just need to add “?wsdl” to the end. As a result your WSDL location should be <site>/_vti_bin/lists.asmx?wsdl
To add an item to a SharePoint, I’ll be using the Lists.UpdateListItems method so expand the grouping for UpdateListItems and click on the SOAP Request.
SoapUI gives you a template for the request but you will need to add more information. You can get an example and further explanation of each tag from MSDN. This is the XML to add an item to TestList:
<soapenv:Envelope xmlns:soapenv=”http://schemas.xmlsoap.org/soap/envelope/”
xmlns:soap=”http://schemas.microsoft.com/sharepoint/soap/”>
<soapenv:Header />
<soapenv:Body>
<soap:UpdateListItems>
<soap:listName>TestList</soap:listName>
<soap:updates>
<Batch OnError=”Continue” ListVersion=”1″ >
<Method ID=”1″ Cmd=”New”>
<Field Name=’ID’>New</Field>
<Field Name=’Title’>Testing</Field>
</Method>
</Batch>
</soap:updates>
</soap:UpdateListItems>
</soapenv:Body>
</soapenv:Envelope>
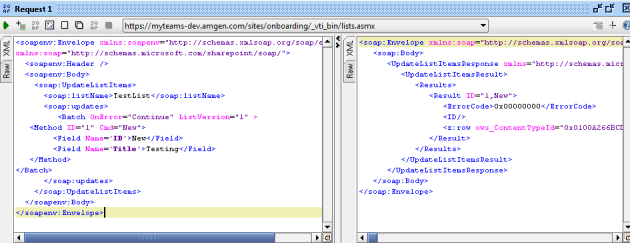
Once you have the XML done, click on the green arrow in the upper left to submit the request. If you’ve done it correctly you should see a confirmation on the right:
Done! You can also check your results by going to the SharePoint list and verifying that the item was created.
My Learnings
- Apparently you can add an item without filling out the required fields in the list
- Translating Field Names that have spaces or characters in the name. For example:
- Field name in SharePoint list: Personnel Area
- Internal field name from the URL: Personnel%5Fx0020%5FArea. (You can get this by clicking on the field from the list settings and looking at the URL)
- When you replace the URL encoded characters, it translates to Personnel_x0020_Area, which is the Field Name for your SOAP XML
- Field types:
- For populating a choice field, you just need to put the choice value
- For populating a date field, use the following format: year-month-day (ex. 2011-1-10)
- For populating a person field, you’ll need to input the user’s ID, which is a pain because it varies between sites based on when the user was added to the site. You can find out the person’s ID by hovering over the person’s name and looking at the URL — it will be the value of the ID query string variable.
Conclusion
You can use SoapUI to test out Sharepoint web services. SoapUI has other functionality too so you should definitely check them out!


I tried to use SOAPUI for calling the lists service, but unable to get past after adding the WSDL, it prompted me for credentials but after that it took forever to finish ‘loding the definition’, it is hung on ‘loading definition’ window..any thoughts?
Perhaps its a network issue? Can you access it with other methods? Also, try double checking your Soap UI preference settings.
SoapUI doesn’t seem to work directly with NTLM authentication, but you can use a proxy such as Burp Suite to do the auth for you.
Download Burp Suite from http://www.portswigger.net/suite/ and crank it up.
On Burp’s “Proxy : Intercept” tab, click the button to turn intercept off.
On Burp’s “Proxy : Options” tab, make sure it’s set to an unused port, the default is 8081
On Burp’s “Options” tab, tick “do www authentication” and add a setting for the server you wish to hit. Also tick “prompt for credentials on authentication failure”
Switch to Burp’s “Proxy : History” tab so you can see requests going through.
In SoapUI, choose File > Preferences, then select “Proxy Settings”. Enter Host “localhost” and port “8081”.
Use SoapUI as normal. It will send requests through Burp Proxy, which will do the NTLM authentication for you.
This does not work out in my case. I realy don’t know the reason but definitely it has to do with configuration of the Share Point server. Any details on the Sharepoint configuration touch points related to web service access and authorisation?
did you every solve this problem? i have the same problem… cannot connect to any web services with soap ui in sharepoint
Hello all,
I’ve the same issue, Have you got an idea Jaclyn?
Pingback: Updating a List using SharePoint Web Services using SoapUI | Ucuuba's Bletherin
Thanks for the BurpSuite recommendation. Worked like a charm!