Custom Ranking Model
June 16, 2011 1 Comment
In SharePoint 2010, you can create a custom ranking model that will allow you to control the ranking of search results. Custom ranking models are important because it allows your organization to tailor their search results based on what is important to the organization. In this blog, I’ll be outlining what I’ve learned about custom ranking models from playing around in SharePoint and via blog posts found on the web.
Looking at the out of box SharePoint 2010 ranking models
Before going into custom ranking models, I want to point out that SharePoint 2010 has nine out of the box ranking models:
- Main Results Default Ranking Model
- Expertise Social Distance Ranking Model
- High Proximity Ranking Model;
- Main People Social Distance Model
- Expertise Model
- Name Social Distance Ranking Model
- Name Model
- Main People Model (default for people core results)
- No Proximity Model
You can view what ranking models are available through a Powershell command:
Get-SPEnterpriseSearchServiceApplication -identity <Search Service Application Name> | Get-SPEnterpriseSearchRankingModel
You’ll need to replace <Search Service Application Name> with your Search Service Application. In my case, it’s “Search Service Application”:
If you want to view the XML for these ranking models, you can through a SQL query in the database:
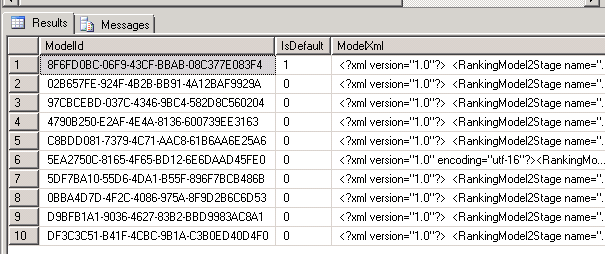
SELECT TOP 100 [ModelId], [IsDefault], [ModelXML] FROM [Search_Service_Application_DB_name].[dbo].[MSSRankingModels]
You’ll need to replace [Search_Service_Application_DB_name] in the SQL query with your search service application database name. When you execute the SQL query your results should look something like this:
Now that we have a list of available ranking models, we get the XML by clicking on the ModelXML for a ranking model and copying the XML. I use Notepad++ to view my XML and Notepad++ has a cool feature to reformat the XML to make it more readable (I have Notepad++ v5.9.2). Open Notepad++ as administrator and once you paste the XML in, click TextFX > TextFX HTML Tidy > Tidy: Reindent XML. It helps to see what the XML is for the out of the box ranking models.
Creating a Custom Ranking Model
Sometimes we need to create our own custom ranking model. Microsoft gives us a standard schema to create a ranking model and an explanation of each of the elements here: http://msdn.microsoft.com/en-us/library/ee558793.aspx
Schema:
<rankingModel name=“string” id=“GUID” description=“string” xmlns=“http://schemas.microsoft.com/office/2009/rankingModel”>
<queryDependentFeatures>
<queryDependentFeature pid=“PID” name=“string” weight=“weightValue” lengthNormalization=“lengthNormalizationSetting” />
</queryDependentFeatures>
<queryIndependentFeatures>
<categoryFeature pid=“PID” default=“defaultValue” name=“string”>
<category value=“categoryValue” name=“string” weight=“weightValue” />
</categoryFeature>
<languageFeature pid=“PID” name=“string” default=“defaultValue” weight=“weightValue” />
<queryIndependentFeature pid=“PID” name=“string” default=“defaultValue” weight=“weightValue”>
<transformRational k=“value” />
<transformInvRational k=“value” />
<transformLinear max=“maxValue” />
</queryIndependentFeature>
</queryIndependentFeatures>
</rankingModel>
queryDependentFeatures is for managed properties for the dynamic ranking parameter. Dynamic Ranking is ranking that is dependent on the content or property values for a content item; this is also known as query-dependent ranking
queryIndependentFeature contains a static ranking parameter. Static Ranking is ranking that is not affected by the content or property values for a content item; this is also known as query-independent ranking
Weight is the property weighting. You can change the property weight to change its relevance — the higher the weight, the more relevant.
lengthNormalization – properties within an item can have varying lengths. If the values in these properties are treated equally regardless of their size during relevance calculation, it can have a negative impact on the calculated rank. Length normalization adjusts the rank of a content item based on the property length.
Pid is the property ID. You can find the pids for each of the properties with the following Powershell command:
Get-SPEnterpriseSearchServiceApplication | Get-SPEnterpriseSearchMetadataManagedProperty
In the end your XML should look something like this (your values will be different depending on your needs):
<?xml version=”1.0″ encoding=”utf-8″?>
<rankingModel name=”CustomRanking” id=”5EA2750C-8165-4f65-BD12-6E6DAAD45FE0″ description=”Custom Ranking” xmlns=”http://schemas.microsoft.com/office/2009/rankingModel“>
<queryDependentFeatures>
<queryDependentFeature pid=”459″ name=”field1″ weight=”0.5″ lengthNormalization=”0″ />
<queryDependentFeature pid=”460″ name=”field2″ weight=”1.0″ lengthNormalization=”0” />
</queryDependentFeatures>
</rankingModel>
Adding the Custom Ranking Model
Now that you have a ranking model, you need to add it. First organize the XML into one line and copy it with Ctrl+C. Then run the following Powershell command:
Get-SPEnterpriseSearchServiceApplication | New-SPEnterpriseSearchRankingModel
When it prompts you for the RankingModelXML, paste the XML for your ranking model. You can verify that your ranking model was added by running the following Powershell command to show all the ranking models:
Get-SPEnterpriseSearchServiceApplication -identity <Search Service Application Name> | Get-SPEnterpriseSearchRankingModel
If afterwards you want to delete the ranking model, you can with the following Powershell command:
Get-SPEnterpriseSearchServiceApplication -Identity <Search Service Application Name> | Get-SPEnterpriseSearchRankingModel -id <rankingModelID> | Remove-SPEnterpriseSearchRankingModel
Applying the Custom Ranking Model in Enterprise Search
There are a couple of ways to apply the custom ranking model.
- Add “rm={RankingModel ID}” parameter to the search query string. You will need to replace {RankingModel ID} with the ID of your ranking model
This is most useful if you want to test the effects of the ranking model on the fly.
- Change the “DefaultRankingModelID” parameter of the search results web part
Steps:
- Export the search results web part
- Open it in SharePoint Designer
- Change the “DefaultRankingModelID” value to the custom ranking model ID
- Re-import the web part onto the page
This is a good option for the IT pro who doesn’t have access to develop.
- Inherit the core results web part in code
Conclusion
In this blog post, we looked at SharePoint 2010 ranking models and how we could create and apply custom ranking models.
References:

